Introduction
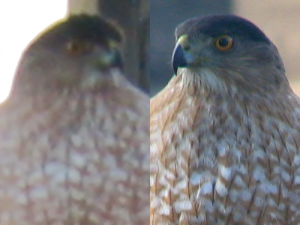
Everybody knows that feeling: This is the perfect situation for an amazing shot, the object of desire is right in front of you, you do not hesitate long and ready your camera, you take the shot and a feeling of satisfaction is coming over you. Everything is perfect. After that, you check the photo list and you are shocked: the image is blurry, the focus of your shot is off and the person you photographed has this overlying shadow all over her. And there it goes; the feeling of satisfaction is replaced with disappointment and the joy you felt while taking the supposedly perfect picture is washed away by desperation. You ask yourself: “What did I do wrong?”
Well, we cannot answer those questions but we can prepare you for doing it better the next time. This entry is dedicated towards the topic of taking a good picture, without having to buy a camera for several thousand currency. In the following article, you will find several guidelines to make your endeavors more rewarding and successful.
1. Preparation
Unfortunately, it is not always as easy as walking around, taking pictures and expect to make some amazing images ready to be shown to friends or relatives who will be amazed of your skills.
The first step to success is to getting used to your equipment. Take your time and explore the capabilities and limitations of your camera. There might be features you have never seen before because you were just too eager to take photos. As usual with all electric devices it is recommended to read the instruction manual. A lot of additional information can be usually found on those documents and can greatly improve the effectiveness of your actions. It can also help if you read some lecture related to photography to gain knowledge and get a few tips from professional.
2. Resolution
After you discovered the potential of your camera you might want to set the resolution of your device to the maximum. This action serves two purposes: First, all your photos will be clearer and it will be easier to see important details on the images itself. Furthermore, it will be much easier to alter and edit the pictures later on. If you, for example, use Photoshop to crop a picture with a lower resolution it might be too pixelated to be printed.
A higher resolution means it uses more space of the memory. However, the benefits of making more photos do not outweigh the disadvantages of blurry or pixelated images. In this case, it can be referred to the saying: “Quality over quantity”.
3. Explore
With all things set, the “only” thing you have to do is discovering the right opportunities for a good photo. Well, this is easier said than done and to be sure you do not miss out on something, take your camera everywhere. The likelihood of seeing something interesting and be able to use your camera on it is drastically increased if you just get out into the world and start firing away. Use your Sundays for a stroll in the park; take a few pictures than sit down on a bench and wait. Patience is the key: Take your time and do not be disappointed if the results are not great from the get-go. Also, try to visit the same places at different times and see what changes occur in terms of lighting and surrounding. Often you will notice pretty severe changes in your environment depending on the time; use this to your advantage.
4. Using your camera
After getting familiar with your equipment, it is essential to adjust your camera settings based on your surroundings. This is based on the fact that a camera is seeing objects differently than our eyes. In the recent years, digital cameras became quite “clever” and the feature to automatically adjust makes this task rather easy. However, this helpful feature is not always 100% correct and sometimes it is necessary to adjust various factors.
One of those factors is the White Balance. To put it simple: every light source has a “color temperature” which differs widely depending on the source of the light. For example, the light of the blue sky is cold and therefore, the camera is seeing it in a blue color. On the other side of the spectrum, the color of a burning candle tends to be orange and therefore, the camera will see it differently from how we perceive it. This change in color can be changed with specific editing software later on, but you should try to get it right in the first place.
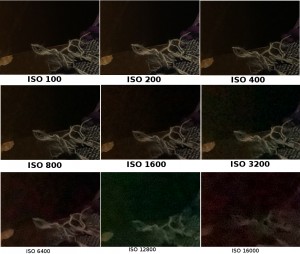
Another very important adjustment which has to be made is ISO. ISO indicates the camera’s sensitivity to light. The component which can change the sensitivity is called the “sensor”. This part of the camera determines how much light is transformed into the image. The higher the ISO value, the higher the sensitivity to light and more light is captured which enables the photographer to take pictures in a dark environment, even without a flash. However, this feature comes with a flaw: the higher the amplifier for the ISO is, the more “noise” is added to the image. An example of the different ISO levels and their effect on the picture can be found on the following image. As a general guideline, you always want to stick to the base ISO to get the highest picture quality but feel free to experiment with it.
5. General tips
If you adjusted your camera and before you are going to take your first real pictures, there are a few general guidelines which you could consider sticking to.
The Rule of Thirds
At the start, you should use the “Rule of Thirds”. This rule states that an image is divided into nine equally sized parts, which are divided by two horizontal and two vertical lines. It is said that aligning the object of interest along those lines creates a more meaningful image. Therefore, you should determine the points of interest in advance and position yourself accordingly. In the picture below, it can be seen that the statue in the background as well as the couple, are aligned to the imaginative lines.
After you mastered this technique you can try and deviate from this rule. Sometimes it is extremely useful to place your objective off-center in order to make it even more interesting.
Positioning
We shortly touched the subject of positioning in the previous paragraph, but it has to be stressed that this is an integral part of photography and therefore, deserves a lot of attention. After you took a picture try to move in closer and take another shot. Repeat this and see for yourself how the positioning and angle change the result. Of course, you can also increase the distance to experiment with the scenery.
Based on the object you want to photograph, it might be a good idea to take vertical pictures instead of horizontal ones. High landmarks like mountains and towers usually look considerably better on a vertical image which put their physical appearance into the center of attraction.
Furthermore, try to alter the way you approach the object. Use an inconvenient angle to make a picture: crouching, lying or a top-down approach might lead to better results and more impactful images.
Focus
A very useful but often forgotten feature of a digital camera is the adjustment of the focus. If you press the shutter button gently, the camera will adjust the focus. This will prevent blurry pictures and will increase the quality of the picture taken. The blurry effect can also be caused by shaking hands; so just relax before you take a photo. As an alternative, you could use a tripod to ensure an even surface. However, keep in mind that a tripod makes you less mobile and the additional setup time makes you less flexible.
Flash
As an alternative for a natural light source, it is possible to make use of the Flash feature of a digital camera. This will generate an artificial light source for a very short time. By knowing the range of your Flash, you can better predict the effect of it and ensure better pictures. In general, the range of the Flash will not exceed 15 steps; most of the times you should take no chances and be not further away than 10 steps.
In contrast to a popular belief, the Flash is also pretty useful in situations in which more than enough light is available. Especially in situations where the photographer is reliant on sunlight it is handy to use the Flash to remove those deep facial shadows which can be caused by the sun.
6. Be patient and selective
After you have finished your photo session take your time and go through all of the photos you have taken. Select the ones you think strike out as the best and keep them. Delete the rest, but take a look at them too and determine the mistakes you made. You can learn a lot from those images by pointing out the missing qualities in order to avoid those missteps in the future.
As a last tip, it has to be said that you need to be patient. Photography is an art and it takes time and effort to master all the different external and internal factors. Find your own style and learn from your mistakes.
We hope this small introduction to the world of photography was helpful to you and could provide you with one or two useful tips. Good luck and success for your future photo sessions.


Leave A Comment